Main Menu
Menu

Show posts

This section allows you to view all posts made by this member. Note that you can only see posts made in areas you currently have access to.

Show posts Menu

Topics - Super Villain

#21
For Sale - Parts / Lightweight flywheel chromoly
February 07, 2012, 01:25:05 AM
SOLD SOLD SOLD!!!

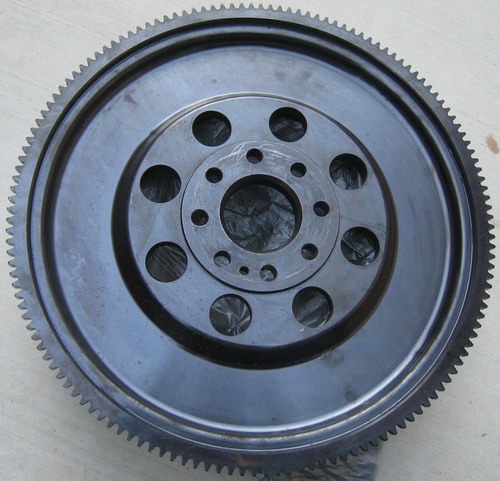
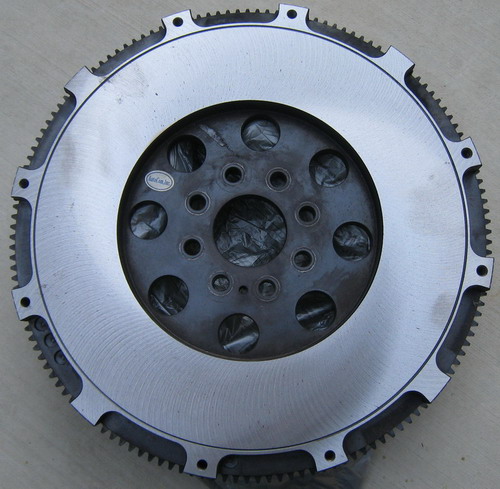
This is a DC Performance lightweight flywheel.  It is made of chromoly and so it balances lighter weight than the stock flywheel and more durability than an aluminium flywheel.

Weight is 20 lbs.  About 10 lbs lighter than factory flywheel.

Used for a few months then had it resurfaced so the face is like new.

Fits Gen 3 Viper.

$250


#22
For Sale - Parts / Brake Man #3 compound brake pads
February 07, 2012, 01:17:43 AM
SOLD! SOLD! SOLD!

A set of The Brake Man pads #3 compound 6-3810.

Used for 2 full track days...very little wear as you can see.

Fits factory Brembo calipers on Gen 3 and 4 Vipers.

$150

#23
SOLD! SOLD! SOLD!

A set of Performance Friction carbon metallic brake pads.  O1 compound 7780.01.18.44.

Used for 2 full day sessions.  Very little wear and still almost full material left.

Fits factory Brembo calipers from Gen 3 or 4 Viper.

$150

#24
SOLD! SOLD! SOLD!

11 feet of 3" orange silicone duct hose.  Rated up to 500 degrees.  Can be used for custom applications like brake ducting, intake, etc.

Never used.

$50


#25
SOLD SOLD SOLD!!!

A pair of M&H Drag Radial track tires 345/35-18.  These are new and have never been mounted or used.  These are DOT rated drag radials so you can bolt them on your wheels (will need 18" wheels) and drive to the track.  Then air them down, make your runs, and when you're done air them back up and drive home.  Do a proper burnout and they are super sticky.  You won't know off the line traction until you've run drag radials.

$400


#26
Here is a set of CCW C12 Corsair Wheels 18x12 with M&H Drag Radials 345/35-18.

SOLD SOLD SOLD!!!

The tires have made only 5 runs down the drag strip. Still a lot of life left in them.  If you want traction at the strip these tires are it.  Heat them up and they are super sticky. These tires are a nice monster size...they stand about 28" tall so I was even able to run them while keeping my 19" wheels up front and still maintained a proper rake/stance.  The tires are DOT rated drag radials so you can drive them to the track, air them down, make your runs, and then air them up and drive home.

Wheel and tire combo mounted and balanced and ready to be bolted on...just add air.

$900


#27
SOLD SOLD SOLD!


I have a set of CCW C12 Corsair wheels mounted with Kuhmo Ecsta V700 track tires.

The wheels are 18x12 and 18x13 and in excellent condition.

The tires where run for one full day and one morning session. Tire sizes are 305/30-18 and 335/30-18.

These are ready to be bolted on and run...just need to air them up.

$1,800


#28
Hey Gang,

Anybody have a set of factory OEM Catalytic Converters (the secondary ones just before the mufflers) that they want to sell me?  Needs to be Gen 3 or Gen 4 and needs to be in good working order.

Let me know, thanks!

#29
Catch As CATCH CAN

The title is a phrase I have heard batted around more than once.  Often in the company of older people who were more learned and literate than I could ever hope to be.  As an adjective, it means using any available means or method.  Well as a gear head, that certainly sounds like hot rodding to me!  Only this time around this little bit of shade tree engineering actually involves a Catch Can.  Some of you may have heard the term Catch Can tossed around before and wondered why do we need a can and what the hell does it catch?!  To put it simply, a Catch Can separates oil from the crankcase gases flowing into your intake manifold and traps it until you dump it out.

To get into the details, we will first need to make a quick stop at Engines 101 and understand a bit about PCV.  It stands for Positive Crankcase Ventilation and this system's main purpose is to vent out the pressures that build up inside the engine as part of the normal combustion process.  This pressure can be so great that if it is not properly vented, gaskets and seals can get over-pressurized and blow out.  The gas pressures are made up of unburned fumes, oil vapors, blow-by, and other unpleasant leftovers.  They are re-routed back through the intake manifold and into the cylinders again for another chance to be combusted.  The other function of the PCV is to supply the crankcase with fresh air.

On a stock Gen 3 Viper, a hose from the air cleaner box is connected to the passenger side valve cover.  This hose supplies fresh, clean air to the crankcase.  It is in front of the throttle body so that the air supply is uninterrupted whether the throttle blades are open or closed.  On the driver side valve cover, a hose is connected to the intake manifold from underneath. This location is also behind the throttle body.  Vacuum from the intake manifold helps to pull in the vapors from the crankcase.  This is what helps to relieve the pressure build up and any unburned gases are cycled back through the intake to be combusted again.  On a stock Gen 4 Viper, the hose arrangement is opposite, but still does the same thing.  The air box hose connects to the driver side valve cover to supply fresh air to the crankcase.  While the hose on the passenger side valve cover is connected to the intake manifold.

Now that all sounds fine expect for one very critical flaw...the intake manifold hose that uses vacuum to pull in gases and relieve the pressures in the crankcase is also sucking in oil vapors.  Once these oil vapors get inside the intake manifold they pretty much make a mess as they start coating the insides with a film of oil.  This contaminates the air going into the combustion chamber (less fresh oxygen air molecules means less power) and over time this contamination also lowers the octane rating of your fuel.  Once your fuel octane starts dropping the engine will start to knock and ping.  When the computer sees this it will pull back on timing which will of course cost you even more power.

This is where the Catch Can comes into play.  It is installed in between the hose going into the intake manifold and the connection to the valve cover (passenger side on Gen 4s and driver side on the Gen 3).  The Catch Can serves as a oil separator by having the gases and oil vapors flow through it and then trapping the gunk so that only the air and fumes continue on into the intake manifold.

There are a number of Catch Can options on the market and at varying price points.  The designs range from a simple empty cylinder with an "in" hose fitting and an "out" hose fitting.  Others add a bit of steel wool inside as a barrier to help separate the oil from the gases.  Some have breathers while others have special baffles and chambers inside.  After much research, the one that seemed to have the best features and still be reasonably priced was the McKinney Raceworks Catch Can (web link: http://tinyurl.com/viper-catch-can ).  $133 is a decent price for this design.  

Balancing the great features with ease of install and simple regular maintenance while hitting the right price point is always a challenge, but the McKinney Raceworks Catch Can seems to have done it.  It is CNC milled from a solid 2.25" rod of 6061 Aluminum so it feels hefty and fitting under the hood of a Viper.  At 7 inches long and 2.25" diameter it is easy enough to find space for it to fit in the engine bay.  As a totally sealed design, it really allows the vacuum from the intake manifold to suck the air out of the crankcase.  They make several versions with the main differences being the size and arrangement of the fittings.  The 1/2 inch 90 degree fittings are the ones that will work best due to the Viper's low hood clearance.  

They always say its what's on the inside that counts and that is certainly what won me over on this one.  The "dirty" crankcase air enters in through one port and travels down a ½ inch tube inside the Catch Can.  As the vapors exit the tube they encounter a small gap between the exit tube and the funneled surface of the Catch Can's mid-section.  A lot of the oil particles will impact on the funnel surface of the mid-section and then drain down into the bottom trap chamber.  The radius turn into the next exit chamber is quite sharp so while the air can flow into it, the oil vapors will lose velocity making the turn and entering the larger space.  This will cause any leftover oil, that did not impact on the funnel surface, to drop out of suspension of the air stream.  They would then condense on the mid-section and drain down.  Now the fumes and vapors that made it into the exit chamber must pass through some packed steel wool which will act as a kind of filter media, further separating out any remaining oil vapors or gunk.  This all ends up draining back down into the bottom section.  And finally, a foam filter is the last barrier before the air is allowed to be re-introduced into the intake manifold.

The bottom section of the Catch Can is where all the oil that condenses on the funnel surface of the mid-section drains into.  The drain hole is a small port in the middle of the mid-section.  This also helps to act as a baffle to further prevent oil trapped in the bottom section from traveling back up into the upper chambers under hard cornering or braking.  And for ease of maintenance, the bottom section comes off with a twist and then you can just properly dispose of all the collected oil and particles.  Looking inside the "cup" one can't help, but think how all that oil and gunk would have ended up in the intake manifold.

Here is a basic parts and cost list for install into my 2006 Viper.  You may need to adjust a bit depending on your model year.  Total install time should be a little over an hour.

1 Catch Can - $133
3 feet of 1/2 inch hose - $4.47
1 foot of 5/8 inch hose - $1.59
1 T-Bolt steel hose clamp 2.06"–2.37", 3/4" width - $3.30
1 Worm drive hose clamp 2.25"  - $1.50
2 Brass barb hose fitting – female 1/2 inch - $7.94
2 Brass barb hose fitting – male 5/8 inch - $5.64

Total for main parts came to about $157.44.  You will also want to have some smaller hose clamps or zip ties available for tightening any hose ends, but any self-respecting petrol head should already have that in their garage right?  Okay...I won't look while you run to the parts store and stock up.

You could save a few bucks by using plastic barb hose fittings that already come in a 5/8" to 1/2" adaptor.  I was short on time and my OCD demanded that it be done before the next Viper Cruise, which incidentally was the next morning so overpriced brass fittings for me.  The connector coming off the intake manifold and the rubber connector off the driver side valve cover on my Gen 3 was 5/8".  The Catch Can fittings were 1/2" so this is were the fittings come in to size down the hose.  The 1 foot of 5/8" hose goes directly on to the plastic connector coming off the intake.  Then the 5/8" to 1/2" adaptor goes on allowing you to run 1/2" hose all the way to the "OUT" port of the Catch Can.  For the valve cover, you plug the 5/8" to 1/2" adaptor right into the rubber elbow.  Then you run 1/2" hose all that way back to the "IN" port of the Catch Can.

The T-bolt clamp is what you will use to clamp around the Catch Can.  I like the Murray clamps.  Sure you could use a worm drive clamp with the slots, but the T-bolt clamp looks a lot cleaner.  The worm drive hose clamp is what you will use to hold the T-bolt clamp and thus the Catch Can against the engine bay brace bar.  Be sure to get a good quality clamp of thick gauge.  I used the clamps made by Ideal.  Some of the cheaper brands will bend when you try wrenching down on them.  And for this you will be wrenching down good to get a tight grip.  Once the clamp is tight and there is little to no movement from the Catch Can, you may notice that the worm drive clamp is not flush against the brace bar.  Just get a block of wood and then hammer down on the clamp until it goes flush.

Take a look at the pictures for further details.

It doesn't matter if the car is stock, mildly modified, heavily modified, or supercharged.  All Vipers can benefit from a good Catch Can.  One note for supercharged Vipers...you will need a one-way check valve on the line going into the intake manifold so as to not push air back into the Catch Can under boost.  In short, sucking oil into the intake manifold is never a good thing.  It contaminates the air and lowers your fuel's octane rating.  The inevitable knocking and pinging will cause your timing to be pulled by the computer and the end result will be a loss of power.  So there I just saved you some horsepower!  Paypal donations and introductions to single, loose women will be greatly appreciated.  

" border="0
12 oz ice tea can for size reference.  I drank it later and recycled the can too!  After which to balance things out I drove my obnoxiously loud, heavily modified Viper in a very non-eco friendly manner.  

" border="0
The bottom section twists off to easily inspect the contents and then dispose of any oil collected.  To the left you can seen the bottom side of the mid-section.  Notice the drain hole in the center.  This design prevents the oil from splashing up during hard cornering or braking.

" border="0
All 3 main sections apart.  The mid-section is held in by two screws.  The o-rings help to form a nice air-tight seal.  The funnel surface of the mid-section directs oil to all drain down the center.  You can also see inside of the top section.  Note the 1/2" tube that brings in the "dirty" air and the steel wool that the air must pass through before exiting the "clean" port.

" border="0
Steel wool removed and now you can see the final foam filter.

" border="0
Foam filter removed and you can see the "clean" exit port and a better shot of the inlet tube.

" border="0
I couldn't resist and had to "church" it up a bit before the install.  Some polishing with Mother's Metal Polish and a Viper logo does wonders! ;)

" border="0
Installed!

" border="0

" border="0

" border="0

" border="0

" border="0

" border="0
The Catch Can was installed the night before our Dukes Poker Run and was clean as a whistle.  Right after I got home I twisted off the cap and this is what I found.  That's a lot of oil and gunk!

" border="0
Now granted I did drive her pretty hard that day and I do have a big cam, heads, 11:1 compression etc. so you may not be pulling as much oil as I do under load, but daaaamn thats a lot of oil after just one day.  I'll have to check this thing at least 1 to 2 times a month.  For track days I will need to check her each day.

Happy Motoring!

#30
General Viper Discussions / Mouse pad
March 23, 2010, 04:04:52 PM
BTW I just wanted to say that the new VCA 2010 mouse pad is awesome!  Just when I was thinking I needed to get a new one a couple of weeks ago... this one pops in the mail.  I love useful freebie perks like this ;)
>v
#31
Track Events / I just posted some Toyo R888s for sale
February 26, 2010, 03:41:19 PM
I just posted some Toyo R888s for sale in the for sale section of all places! ;)

http://socalviper.com/forum/index.php?topic=1133.0
#32
Toyo R888 track tires for sale:

315/30 R18 $400 for the pair SOLD
I have two and they are new and have never been driven.  I bought them from Forgeline and they shaved them too.  I had them mounted on my track wheels and then they just sat in storage last year.  Time to unmount and sell them!

335/30 R18  $160 for the pair
Theses were purchased from John Berget.  He gets good quality used tires from the pros after they have run a qualifying session.  These are used, but in good condition and you should be able to get a good number of track days out of them.  I have never mounted or run these.  They are in the same condition as when John first shipped them to me.

335/30 R18 $120 for the pair
These were also purchased from John Berget.  Same deal as above except that I did mount and run these tires for two track days.  But I drive really slow ;) so they are still in good condition.

Factory 10 spoke wheels with Michelin Pilot Sport Run-Flats $900 SOLD for all 4 tires and wheels
275/35 R18 and 345/30 R19
Tires had about 5,000 miles on them before I put them in storage.  Wheels are in good condition with a few minor nicks and scratches.  I will take more detailed pics of the wheels if you are interested.  Here is a link to some pics of them while they were on the car: http://www.viperalley.com/forum/viper-discussions-srt/65859-official-hello-you-some.html

PM me or just respond to this thread.

thanks,
Anhtuan

#33
Not quite Snakes On A Plane, but how about Vipers On A Dyno? This one has a better ending, I promise. ;)

On April 5th, our SoCal Club had a Dyno Day at Stack Performance in Anaheim. Ryan and his team were very gracious hosts and took good care of us and our cars...not to mention fed us some yummy burgers! A big thank you to them for supporting us! And of course, Dan and Cathy worked their usual magic "herding cats" to organize this event. Hats off and thanks to them!  Of course, after the Western Zone Rendezvous this one must have been a cake walk! ;)

Numbers Game
A quick note about chassis dynos, they basically measure the amount of horsepower and torque your car puts down to the ground (that is a very basic and simple explanation. If you want more details wikipedia is your friend). This number is always lower than what the car is rated for at the engine. For example, Gen 3 Vipers are rated at 510 horsepower according to SAE standards and this is measured at the engine. On a chassis dyno, it would measure about 445 horsepower and this is due to the losses induced from running that engine power through a transmission, rear diff, wheels, etc. So you start with 510 HP, but end up with less by the time it makes it to the ground. Other factors such as different wheel and tire sizes, lower gears, etc. can all affect to give the impression of lower dyno numbers. For example, take two identical Vipers one stock (3.07 gears) and the other with lower gears (3.55) and on the chassis dyno the one with the lower gears will look like it has about 10 less horsepower. But you then take those same cars and drag race them (assuming good traction for both); the Viper with 3.55 gears would destroy the stock one and by a lot!

It is also very easy to get caught up in dyno numbers and then you go running around claiming it is the end all be all of car performance. We have a name for people like that...its "Dyno Queen" and I've got a tiara and pink boa with your name it. Keep it up and I'll start calling you a "waxer" as well. ;) If you really want to know your car's performance then see you at the track!

The fact is, dynos are great tools when approached with the right mindset. The info they provide can help trouble shoot, set a baseline for before and after performance mods, or just testing and data logging. But you cannot really go around comparing dyno numbers unless they were all taken on the same dyno and on the same day. This is because every dyno is different as well as the conditions during which they are run. Even among the same brand, the readings can be different. This one will cook your noodle...at Stack Performance my car dyno'd 489 HP. A week later I dyno'd the car at DC Performance in West LA and it registered 472 HP. Both dynos were the same type- Dyno Jet.  So did I suddenly lose 17 HP?  Nope!  Just proves my point...different dynos read differently.  Dynos are a guide.  Don't get hung up on the numbers unless they're from the same dyno.  Now don't get me wrong, its always fun to see what your car will dyno at and since each dyno is different, it is sort of a guess every time...kinda like Keno, but not as fun.  At least you won't be surrounded by blue haired, chain smoking, old ladies screaming "Keno!"

Exhaust Notes
In addition to just a Dyno Day, I wanted to add a bonus and shoot some video and measure sound levels to help answer the age old performance question about exhaust systems.  We've all seen the posts..."What kind of exhaust should I get?", "Should I get headers?", "What will it sound like?", "How loud will it be?"

I hope that this video will help as an initial reference point for some of those questions.  I kept it focused on just Gen 3 and 4 to make it easy on me and then I tried to avoid duplicates in my editing of the final footage.  For example, there won't be 2 clips of 2004s with stock exhausts.  I wished there was more variety in the setups, but it just means we need more people in the club to MOD!  You know you want to!

Here is the video:
http://www.pod9.com/ant/viper/exhaust_stack_dyno_day.wmv
(I will post this to the big board and the alley later.  I may need to make a youtube version so my server doesn't get hammered)

The sound quality of an exhaust system is subjective and dependant on each individual's tastes.  But to help answer how loud will it be, the sound level meter helps quantify that into terms most everyone can relate to.  In this case, the sound is measured in decibels and it is expressed as a unit of dB or dBA to show the "A" weighting which closely relates to human hearing.  It is also important to note that decibel units are exponential as the numbers go up.  For example, a sound that is 60 dBA is TWICE as loud as a sound that is 50 dBA.

A 1 dBA difference is practically imperceptible to human hearing.  In other words, we can't tell the difference between 70 dBA and 71 dBA.  At about a 3 dBA difference, we start to notice a slight change in sound levels.  A 5 dBA difference is definitely noticeable.  A 10 dBA difference is perceived as twice as loud between two sounds.

To help better illustrate this and to provide a reference point here are some sound comparisons:

(The following list taken from a study by Marshall Chasin)
-A Quiet Library  =  30 dB
-People talking in conversation (3' to 5' distance)  =  60-70 dB
-Phone dial tone (held right up to your ear)  =  80 dB
-City Traffic (inside car)  =  85 dB
-Train Whistle at 500'  =  90 dB
-Snowmobile, Motorcycle  =  100 dB
-Power Mower at 3'  =  107 dB
-Power Saw at 3'  =  110 dB
-Sandblasting or Loud Rock Concert  =  115 dB
-Jet Engine at 100' or a Gun Blast  =  140 dB

Sustained exposure to sound levels of 90 to 95 dB without hearing protection can result in hearing loss. 

As for our Vipers, I was able to baseline a stock Gen 3 and a stock Gen 4 and then a couple of different setups for each.  I noted sound levels at cruising, high speed, and then the peak at wide open throttle.  In some cases I had to take a weighted average of the sound.  Here is what I found:

2004 Gen 3 that is totally stock
Cruising = 77 dBA
High Speed = 84 dBA
WOT = 107 dBA

The exhaust temp at the tips after the dyno run was 308 degrees.

05 and 06 Gen 3 with just 3" Corsa Track mufflers
Cruising = 78 dBA
High Speed = 86 dBA
WOT = 107 dBA

Exhaust tip temp after the dyno run was 369 degrees.

My theory as to why the cars with Corsas were hotter at the tip than the Stock one has to do with the long crossover tube in the stock system.  The further the hot exhaust gases have to travel from the engine the more it cools down.  This happens not only due to the length of travel, but also with more metal tubing present more of the heat is absorbed like a heat sink.  Since the Corsas do away with the crossover tube, the exhaust gases go straight out the sides and stays hotter thereby also helping to maintain hot gas velocity.  The stock system retains more of the heat and keeps us nice and toasty inside...if only we lived in Vermont.

Also interesting to note is that the Corsa had the same sound levels as the stock system during cruising and WOT.  And they were just a little bit louder at high speed.  Though one thing the sound level meter can't really measure is tone.  While the sound levels between the two were similar, the Corsa had a deeper tone than the stock system.  The human ear may perceive this as louder even though it really isn't.

06 Gen 3 with American Racing Headers (1-5/8" X 1-3/4" step design with Swain Tech thermal barrier coating) and Classic Chambered Exhaust's 3" Cobrapacks 28" body length with packing.
Cruising = 83 dBA
High Speed = 88 dBA
WOT = 113 dBA

Yes, Virgina, headers do make the car louder and No there is no Santa Clause.  I'll be doing a separate write up of this exhaust system and how it came together at another time (soon, I promise!).

08 Gen 4 with stock exhaust
Cruising = 78 dBA
High Speed = 83 dBA
WOT = 107 dBA

Sound levels were pretty much the same as a Stock Gen 3.

08 Gen 4 with Belanger headers and exhaust
Cruising = 80 dBA
High Speed = 88 dBA
WOT = 112 dBA

At WOT and High Speed, definitely louder than stock and on par with the 06 header/exhaust Viper.  However at cruising it was only a little louder than stock, but still quieter than the Gen 3 header/exhaust car.  Damn VVT! ;)

09 Gen 4 ACR with Belanger headers and stock mufflers
Cruising = 79 dBA
High Speed = 86 dBA
WOT = 112 dBA

This setup is a little quieter at high speed from the Gen 4 with full Belangers.  But again the perception of tone plays in here.  The Belanger with stock mufflers had a more mellow tone than the full Belanger header/exhaust package which had a deeper tone.   

08 Gen 4 with Belanger headers and Corsa Exhaust
Cruising = 79 dBA
High Speed = 87 dBA
WOT = 114 dBA

Sound levels pretty much matched up with the other mod'ed Gen 4's and just a little louder at WOT.  Tone was a little more raspy.  Made the most power of all the Vipers present.

Ford GT
Cruising = 83 dBA
High Speed = 90 dBA
WOT = 111 dBA

Not a Viper, but everybody is going to ask so there are the numbers.  I don't know what the setup of the car was.  Maybe Bruce can chime in with details.  Made some mad power though!  At cruising, sound level on par with the mod'ed 06 Gen 3.  At high speed, louder than most all.  But surprisingly, at WOT about the same as the mod'ed Gen 4s.

Overall it seems that headers have the most effect on the Viper's loudness (especially at WOT).  This does not include heads/cam or supercharger cars.  Muffler changes with factory headers are more about heat reduction and changes in exhaust note/tone with little penalty in overall loudness, at least with the Corsas.  Muffler changes on cars with headers seem to pay more dividends in terms of power.  And between the Corsa, Belanger, and Stock muffler, sound level loudness were close to the same.

Now a very important issue I was not able to test was the one concerning the dreaded drone!  This is best tested from inside the car so maybe at the next dyno day I can run sound tests from inside each car...I'll be sure to be wearing dirty pants with screwdrivers and steak knives in my back pockets.  ;)

#34
For all you track rats!

Last fall I bought way more tires from John Berget Racing Tires than I needed http://www.jbracingtires.net/index.htm

Dan's post about these tires http://socalviper.com/forum/index.php?topic=789.0

These are good, used, shaved tires and since I got them from JB I have never run them.  They are sitting in storage and I need to make some room.

Sizes I have left are:

(will be sold in pairs only)

Toyo R888's

SOLD SOLD SOLD


#35
UPDATE - looks like they just added a Sat. and Sun. on May 9th and 10th!  I am editing my post because I think the weekend would be much easier for most!

Speed Ventures will be up at Streets of Willow Sat. and Sun. May 9th and 10th.  But they were hoping to run a car control / drift area up in the Balcony and this caught my eye. 

For those that attended the Car Control Clinic back in the Fall, it will be just like the skip pad (big circle) where we learned throttle steering and got the feeling of the back end sliding out.  They won't have any cones to hit, just a big circle marked in the ground.  And for only $70 bucks what a great way to spend the day cruising out there, play a little car control/drift, and then head home.

Was wondering if we could get 10 people interested enough to sign up on either of those days (May 9th or May 10th)?

Email from SV with more details on the event:
"The Balcony skid pad is actually up the hill from the Streets.  On a google map, you can see it behind the Budweiser Balcony snack bar above the big track.  One car goes out at a time and can do what they like.  There are no cones but there is a donut-hole in the middle of the pad that you can use to set your turns.  Depending on how many drivers are signed up, you go out for a number of minutes and then the supervisor waves a flag telling you to come in.  Historically, the drivers who have run our skid pad have gotten obscene amounts of time on it for the money.  Many of the serious drifters bring another set of tires/wheels.  If you want instruction, I'm sure we can line that up."

I will admit that the thing that still gets me "puckered" when road racing is going into a turn too fast and having that tail come swinging out.  I was hoping getting more seat time at an event like this would help build more confidence in driving.

It will be like getting a big lot all to ourselves!

Here is the link:
http://www.speedventures.com/events/eventdetail.aspx?id=249


#36
Hey Gang,

I just booked Irwindale's 1/8 mile drag strip to get in some much needed practice and testing before the Mopars at the Strip event.  This will just be a test session so there is no side by side racing.  Just time trials.

They are allowing a max of 5 cars.  If we get 5 cars then it would be $350 per car.  Lyle Larson from DC Performance will be there to help all the cars with their runs.

What:
1/8 mile drag strip rental for practice and testing.

When:
Tuesday March 17th.  11am to 4pm.  Gates open at 10am and we will be allowed on track at 11am.  I plan to be there at 10am so we can set up.

Where:
Irwindale Dragstrip
http://www.toyotaspeedwayatirwindale.com/maps.asp

Let me know if you want to attend as space is limited.  If you just want to show up and watch that's cool too.
#37
Kaleidoscope Polishing in Gardena
310-768-3491
www.kaleidoscopepolishing.com

They do polishing of wheels as well as all sorts of metals like intake manifolds and valve covers etc.  The reason I came to them was because of one of my wheels.  Those of you who saw my car at the car control clinic know about the 19" CCWs I have.  Well...there is a reason they tell you to always remove the center cap when tracking the car ;)  In my case, I was hot lapping the drag strip course and doing hard stops each time.  Well things got a little warm in one of the wheels and since the center cap is only pressure fitted on via an O-Ring... the heat caused it to pop off and go bouncing down the parking lot.  Needless to say it got dinged up pretty bad. 

I also nicked two areas around the lug nuts with an impact wrench awhile back and only those with OCD would ever noticed.  So of course I did ;)

So I found this shop through a referral and I dropped the center cap and wheel off to them and the next day they were re-polished and looked good as new!

Great shop to work with  <1

#38
I have a 2006 Coupe and I just wanted to confirm the brake bleed order.  Is it the usual:

1. Rear Passenger Right
2. Rear Driver Left
3. Front Passenger Right
4. Front Driver Left

I know on some cars it is actually different than what we are use to...just wanted to confirm that here.

thanks!
#39
Track Events / Track Wheels?
August 21, 2008, 07:34:25 PM
Before I go and order a new set of track wheels, I wanted to check around here to see if anybody had any leads on a set.

Looking for 18x11 and 18x13 for an 06 Coupe.

Thanks and see you at the track!
#40
Wow I can't believe its been this long since anyone has posted anything in here...well here goes...

As part of the process to get my 06 Coupe ready for road racing I got a Simpson 6-point harness.  Team Techs are fine too, but I already had a set of Simpson belts from my C5 Vette so I only had to buy 1 more set to have a matching pair.  One for the driver and one for the passenger.

Why a set for both sides you may ask?  Well it is generally expected that the driver (that's you) should afford the passenger the same level of restraints as the driver has.  This is especially true if you have an instructor ride with you.  Try explaining to the instructor why they are stuck with a 3 point lap belt while you are snugly strapped down in your 6-point.  "Um, it'll be easier for you to lean forward and write on your clip board how great of a driver I am?"  ...   "um...no...try again sparky."

Most of you should know that our rides come from the factory with mounting points already in place for a harness set up...unlike my Corvette...these Dodge boys thought ahead and know their customers!

There are 4 main points.  Two are behind the plastic cover behind the driver and passenger seats.  The plastic cover is held in by two metal clips (one on each side).  Use a plastic pry tool or wrap a wide flat head screwdriver in masking or painters tape and this will help to pry off the cover and prevent damage.  Also be sure to only pry off along the left or right edge of the plastic panel as that is where the clips are...not along the top or bottom as this tends to flex the cover too much and not much to pry against.

Once the plastic cover is off you can feel your hand along the metal ledge.  You should feel two rubbery square tapes.  These are covering the two mounting points.  If you push down on the center of them you should feel the depression of where the hole is.  Just cut the tape back with an exacto or razor blade.

Now my Simpson belts came with quick removal latches and eyebolts.  This will allow you to quickly install you belts for track and then quickly remove for the other 98% of the time you are driving.  You just screw the eyebolts into the two mounting holes and now any time you remove the plastic cover you have access to the mounting points for your shoulder harnesses.

Now the final two mounting points are also behind the seat, but much lower down, near the floor.  Many have suggested that it is much easier to handle this part if you remove the seats.  True enough, but taking out and re-installing the seats can be a real pain in the rear.  Unbolting it is easy...trying to actually take the seat out or put it back in... that's the real joy.  I am convinced that the door opening is smaller than the seat!  If you can imagine the whole ship in the bottle thing...well, you get the idea.

I did remove the seat on one side and even pulled up the carpet and all manner of silliness.  By the time I got to the other side I had found a better way!  The time this saves you can be put to better use...spend more time with your significant other, save your marriage, read to the kids, rescue a puppy, count your penny collection...

Here is the real tip...
Flip the handle to ratchet the upper part of the seat fully forward.  Grab the floor slider bar and then slide the seat as far forward as it will go. Now so long as you're not built like Homer Simpson (and if you were how do you fit in the Viper?!), that should give you enough access.

First, find the seat belt and then follow it all the way down to the mounting point.  There you will find a T-50 Torx bolt.  Unscrew it and replace it with an eyebolt.  Make sure you re-attach the seat belt, in other words, the eyebolt should go through the seat belt hole and then screw into the mounting point.  Otherwise, you go from a 3 point seat belt to a 2 point belt and those don't tend to work...at all.

Next, look towards the transmission tunnel.   Find the rear bolt that holds down the seat...the one closest to the transmission tunnel.  Now from that bolt follow straight up along the transmission tunnel about 4.5 to 5 inches.  Now right in that area if you push around with your fingers you will feel the head of a bolt through the carpet.  Cut a hole right there (I just cut an X with an exacto).  You may have to cut away some insulation or rubber sealant, but there it is... the last mounting point.  It is a 5/8 inch bolt.  Put that socket set to use and do your best Tim Allen grunt.  Once that bolt is out you can go ahead and screw in the eyebolt.

And that's it... all 4 mounting points are ready to be...um...mounted...or something...

With this tip it should only take about 10-15 mins per side.

The shoulder harness attaches at the top behind the plastic cover and the lap belt and anti-sub belt clip in near the floor.  And for those that don't know, the anti-sub belt stands for anti-submarine belt...and it does just that...it prevents you from sliding under.  You ever see those belt set ups where the belt comes up at the front of the seat?  Those are WRONG!  If you are not sitting ON the anti-sub belt when you go to clip it in it is not going to do anything for you.  ALL belts should be coming from behind you.  The only time you are not sitting ON the anti-sub belt would be in a racing seat where the slot for the anti-sub belt is cut right into the middle of the seat.

And for the love of all things sweet and fuzzy, don't go driving around normal streets with your 6-point harness thinking you're cool.  You look like a DORK.  Those belts are NOT DOT approved and you can be ticketed for it.  And if you do any kind of driving on the streets that requires you to be bolted in a 6-point then you're an IDIOT and I don't want to be any where near you on the roads.   

Hope this helps! 

Be safe, keep it on the track, and happy Viper-ring